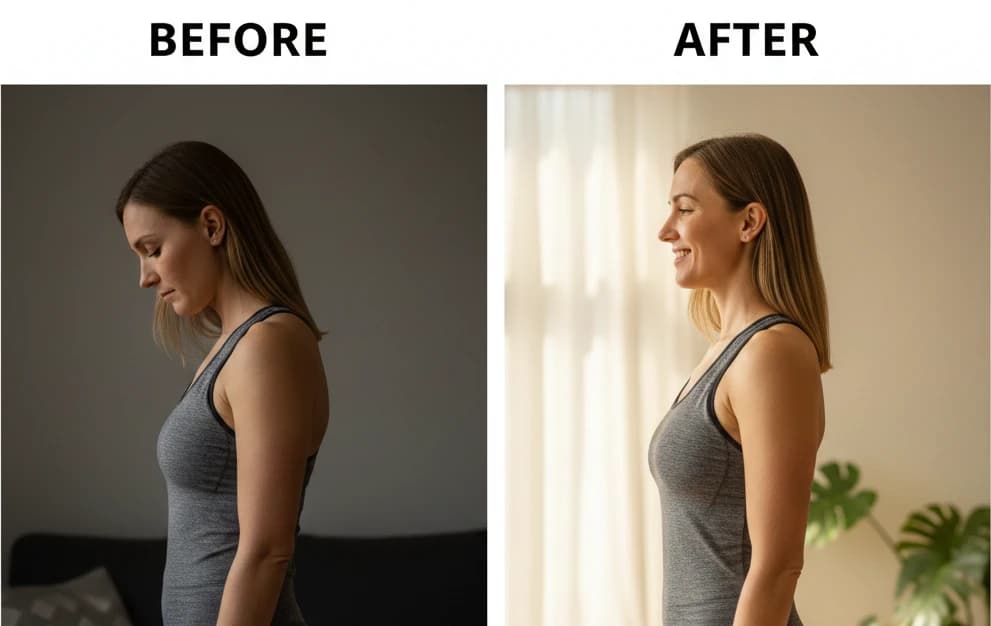
How to Fix Kyphosis: Exercises for a Hunched Upper Back
A hunched upper back, medically known as thoracic hyperkyphosis or simply kyphosis, is one of the most visible postural dysfunctions affecting people today. Whether it developed from years of desk work, poor posture habits, or age-related changes, the characteristic rounded upper back can impact not only your appearance but also your health and quality of life.
The encouraging news? Most cases of postural kyphosis are correctable with targeted exercises, consistent stretching, and mindful habit changes. This comprehensive guide provides evidence-based strategies to fix kyphosis and restore a strong, upright posture.
Understanding Kyphosis: What Is It and Why Does It Happen?
What Is Kyphosis?
The thoracic spine (mid-back) naturally curves outward in a gentle C-shape called kyphosis. This normal curvature typically measures between 20-45 degrees. When this curve becomes excessive—usually greater than 50 degrees—it's termed hyperkyphosis, though colloquially we refer to it simply as "kyphosis."
This excessive curvature creates the characteristic hunched or rounded upper back appearance, sometimes called:
- Hunchback
- Dowager's hump
- Round back
- Stooped posture
Types of Kyphosis
Understanding your type helps determine the best approach:
-
Postural kyphosis - The most common type, caused by poor posture and muscle imbalances. Highly correctable with exercise.
-
Scheuermann's kyphosis - A structural condition where vertebrae develop wedge-shaped, typically appearing in adolescence. Requires medical management.
-
Age-related (degenerative) kyphosis - Results from osteoporosis, disc degeneration, or vertebral fractures in older adults.
-
Congenital kyphosis - Present from birth due to spinal development abnormalities.
This guide focuses primarily on postural kyphosis, which affects the majority of people with hunched backs and responds well to corrective exercise.
Common Causes and Risk Factors
- Prolonged sitting and desk work - Hours spent hunched over computers with shoulders forward
- Smartphone and tablet use - The "tech neck" position encourages thoracic rounding
- Poor exercise programming - Overemphasis on chest exercises (bench press, push-ups) without adequate back work
- Weak back muscles - Insufficient strength in the erector spinae, rhomboids, and trapezius
- Tight chest muscles - Shortened pectorals pull shoulders forward
- Age and osteoporosis - Bone density loss can lead to vertebral compression
- Sedentary lifestyle - Lack of movement allows postural muscles to weaken
- Psychological factors - Depression, low self-esteem, and stress can manifest as hunched posture
- Heavy backpacks - Especially in children and adolescents
Why Fixing Kyphosis Matters
Beyond aesthetics, excessive thoracic kyphosis can cause:
- Chronic back and neck pain - Altered spinal mechanics stress surrounding structures
- Breathing difficulties - Compressed chest cavity reduces lung capacity by up to 30%
- Digestive issues - Compressed abdominal organs can affect digestion
- Shoulder problems - Altered shoulder blade position increases impingement risk
- Headaches - Forward head posture accompanying kyphosis strains neck muscles
- Reduced mobility - Stiff thoracic spine limits arm movement overhead
- Balance problems - Shifted center of gravity increases fall risk, especially in elderly
- Decreased confidence - Hunched posture affects how others perceive you and how you feel
Want to understand the anatomy behind kyphosis? Our free Anatomy Course covers the muscular and skeletal systems in depth, including detailed lessons on spinal anatomy and the muscles that support proper posture.
Self-Assessment: Do You Have Kyphosis?
Before starting a correction program, assess your current posture. These simple tests can help identify excessive thoracic curvature.
1. Wall Test
- Stand with your back against a wall, heels about 2 inches away
- Try to touch the wall with your buttocks, upper back, and head simultaneously
- Keep your chin level (don't tilt head back)
Results:
- If you can easily touch all three points, your kyphosis is minimal
- If your head doesn't touch or you must strain to reach, you likely have excessive kyphosis
- Note the gap between your head and the wall—this indicates severity
2. Mirror Assessment
- Stand sideways in front of a mirror in your natural, relaxed posture
- Observe the curve of your upper back
- Look at the position of your shoulders relative to your hips
Signs of kyphosis:
- Visible rounding of the upper back
- Shoulders positioned forward of the hips
- Head jutting forward (forward head posture)
- Shoulder blades that wing out or are far from the spine
3. Photo Analysis
- Have someone take a side-view photo of you standing naturally
- Draw a vertical line from your ear down
- This line should pass through your shoulder, hip, knee, and ankle
In kyphosis:
- The shoulder will be forward of this line
- The upper back will curve noticeably behind the line
- The head often sits forward of the shoulders
4. Lying Assessment
- Lie flat on your back on the floor without a pillow
- Let your body relax completely
Observations:
- If your upper back doesn't touch the floor comfortably, kyphosis is present
- If you must extend your neck to get your head flat, you have forward head posture
- Note any discomfort—this often improves as you correct your posture
When to See a Professional
Consult a healthcare provider (physical therapist, orthopedist, or chiropractor) if you experience:
- Significant pain or numbness
- Rapidly progressing curvature
- Difficulty breathing
- Kyphosis that appeared suddenly
- Neurological symptoms (weakness, tingling in extremities)
- Inability to stand upright even with effort
- If you're over 65 with new or worsening kyphosis (may indicate osteoporosis)
The Fix: A Complete Kyphosis Correction Protocol
Correcting kyphosis requires a three-phase approach:
- Release tight, shortened muscles pulling you forward
- Strengthen weak posterior muscles to support proper alignment
- Maintain improvements through habits and ergonomics
Phase 1: Release Tight Muscles (Stretching & Mobility)
Tight chest muscles, lats, and a stiff thoracic spine contribute to kyphosis. Address these first.
1. Thoracic Foam Rolling
Target: Thoracic spine mobility, erector spinae release
This is the foundation exercise for kyphosis correction.
- Lie on your back with a foam roller perpendicular to your spine at mid-back level
- Support your head with your hands, elbows pointing up
- Keep your hips on the ground and core engaged
- Slowly roll from mid-back to upper back (not onto the neck)
- When you find a tight spot, pause and take 3-5 deep breaths
- You can add extension: let your upper back drape over the roller
- Perform 2-3 minutes daily
Progression: Use a firmer roller or a double lacrosse ball taped together for more targeted pressure.
2. Doorway Pec Stretch (3 Positions)
Target: Pectoralis major and minor at different fiber angles
- Stand in a doorway with forearm against the frame
- Low position: Elbow at hip level—targets upper pec fibers
- Middle position: Elbow at shoulder level (90°)—targets middle fibers
- High position: Elbow above shoulder—targets lower pec fibers
- Step forward through the doorway until you feel a stretch across the chest
- Hold each position 30-45 seconds per side
- Perform 2-3 times daily
Form tip: Keep your core engaged and avoid arching your lower back.
3. Cat-Cow Stretch
Target: Spinal mobility, especially thoracic flexion and extension
- Start on hands and knees, wrists under shoulders, knees under hips
- Cow: Inhale, drop belly toward floor, lift chest and tailbone, look slightly up
- Cat: Exhale, round spine toward ceiling, tuck chin and tailbone
- Move slowly, spending extra time in the "cow" position to promote extension
- Focus on moving through the thoracic spine, not just the lower back
- Perform 15-20 slow repetitions
4. Thread the Needle
Target: Thoracic rotation and mobility
- Start on hands and knees
- Reach one arm under your body, rotating your thoracic spine
- Let your shoulder and head rest on the ground
- Reach as far as comfortable, feeling a stretch in the upper back
- Hold 20-30 seconds, then rotate the opposite direction (arm up and open)
- Perform 5-8 reps per side
5. Child's Pose with Lat Stretch
Target: Latissimus dorsi, thoracic extensors
- Kneel and sit back on your heels, arms extended forward on the floor
- Walk your hands to one side to bias the stretch to the opposite lat
- Reach fingertips as far as possible while keeping hips back
- Hold 30 seconds per side
- Return to center and hold standard child's pose for 30 seconds
Phase 2: Strengthen Weak Muscles (Corrective Exercises)
With tight muscles released, now build strength in the posterior chain to pull your spine into proper alignment.
6. Prone Y-T-I Raises
Target: Lower and middle trapezius, rhomboids, posterior deltoids
These are essential for kyphosis correction—they target the exact muscles that are weak.
Lie face-down on the floor or a bench:
-
Y-Raise: Arms extended overhead at 45° angles (forming a Y), thumbs up. Lift arms 3-6 inches off the ground. Hold 2 seconds.
-
T-Raise: Arms straight out to sides (forming a T), thumbs up. Lift arms. Hold 2 seconds.
-
I-Raise: Arms straight overhead (forming an I), thumbs up. Lift arms. Hold 2 seconds.
-
Keep neck neutral (look at the floor)
-
Move slowly with control—no momentum
-
Perform 3 sets of 10-12 reps of each position
-
Do this exercise 3-4 times per week
Progression: Hold light weights (1-3 lbs) once bodyweight becomes easy.
7. Wall Angels
Target: Scapular control, thoracic extension, lower trapezius
One of the best exercises for kyphosis—forces thoracic extension while building scapular control.
- Stand with your back flat against a wall, feet 4-6 inches from the wall
- Press your lower back, upper back, and head against the wall
- Raise arms to shoulder height, elbows bent 90° (goalpost position)
- Press the back of your hands, wrists, and elbows against the wall
- Slowly slide arms up overhead while maintaining all contact points
- Slide back down to starting position
- Perform 3 sets of 10-15 reps daily
Common mistake: Lower back arches off wall. Keep core engaged to maintain contact.
Can't maintain contact? Start with just the goalpost position, holding for time until you build the mobility to slide arms up.
8. Face Pulls
Target: Rear deltoids, rhomboids, middle trapezius, external rotators
- Use a resistance band anchored at face height or a cable machine
- Grip the band/handles with palms facing down
- Pull toward your face, separating hands as you pull (external rotation)
- Squeeze shoulder blades together at the end position
- Hold the contracted position for 1-2 seconds
- Slowly return to start
- Perform 3 sets of 15-20 reps, 3-4 times per week
Form cue: Think "pull apart and back" rather than just pulling toward you.
9. Band Pull-Aparts
Target: Rear deltoids, rhomboids, middle trapezius
Simple but incredibly effective for upper back strengthening.
- Hold a resistance band in front of you at chest height, arms straight
- Pull the band apart by moving arms out to sides
- Squeeze shoulder blades together at the end
- Control the return to starting position
- Perform 3 sets of 20-25 reps daily
Tip: Keep these in your desk drawer and do sets throughout the workday.
10. Prone Cobra
Target: Thoracic extensors, erector spinae, lower trapezius
Directly trains the muscles needed to hold your spine upright.
- Lie face-down with arms at your sides, palms facing down
- Squeeze your shoulder blades together and lift your chest off the floor
- Simultaneously rotate your arms so thumbs point outward and up
- Hold the top position for 10-20 seconds
- Lower with control
- Perform 3-5 reps, building up hold time as you get stronger
Progression: Add 3-5 second isometric holds, eventually building to 30+ seconds.
11. Superman Holds
Target: Entire posterior chain, thoracic extensors
- Lie face-down with arms extended overhead
- Simultaneously lift arms, chest, and legs off the ground
- Keep neck neutral (look at the floor)
- Hold 10-30 seconds depending on your level
- Perform 3-5 reps
Variation: Alternate lifting opposite arm and leg (bird-dog from prone position).
12. Rows (Multiple Variations)
Target: Latissimus dorsi, rhomboids, middle trapezius, biceps
Rows are fundamental for building a strong upper back. Choose your variation:
- Inverted rows (bodyweight) - Using a bar or suspension trainer
- Bent-over dumbbell rows - Hinge at hips, row weight to hip
- Cable rows - Seated or standing
- Resistance band rows - Anchor band at chest height
Key form points:
- Initiate the pull by retracting shoulder blades
- Pull toward your lower chest/upper abdomen
- Squeeze shoulder blades together at the top
- Control the negative (lowering) phase—don't let weight pull you forward
- Keep spine neutral throughout
Perform 3-4 sets of 8-12 reps, 2-3 times per week.
Phase 3: Maintain with Ergonomics and Habits
Exercise alone won't fix kyphosis if you spend 8+ hours daily in positions that reinforce it.
Workstation Ergonomics
-
Monitor position: Top of screen at eye level, arm's length away. Use a monitor stand or laptop riser.
-
Chair setup: Feet flat on floor, knees at 90°, lower back supported. Consider a chair with adjustable lumbar support.
-
Keyboard and mouse: Close to body, elbows at 90°, shoulders relaxed (not shrugged).
-
Standing desk: Alternate between sitting and standing every 30-60 minutes. When standing, weight should be evenly distributed.
Movement Breaks
Set a timer to move every 30-45 minutes:
- Stand up and walk for 2-3 minutes
- Perform 10 band pull-aparts or wall slides
- Do 30 seconds of thoracic extension over a chair back
- Take 5 deep breaths with intentional chest expansion
- Roll shoulders back 10 times
Smartphone Habits
- Bring phone to eye level instead of looking down
- Use voice-to-text when possible
- Limit continuous scrolling to 15-20 minute blocks
- Take posture breaks between apps/tasks
Sleep Position
- Best: Back sleeping with a thin pillow under your head and one under your knees
- Acceptable: Side sleeping with a supportive pillow that keeps neck neutral
- Avoid: Stomach sleeping, which forces neck rotation and can worsen thoracic issues
Breathing Practice
Deep diaphragmatic breathing promotes thoracic expansion and counters the collapsed chest posture of kyphosis.
- Sit or lie down in a comfortable position
- Place one hand on chest, one on belly
- Inhale slowly through nose, expanding belly first, then chest
- Exhale slowly, letting belly fall
- Practice 5-10 minutes daily
- Focus on expanding the ribcage laterally (sideways) as well as forward
Sample Weekly Schedule
Daily (10-15 minutes)
Morning:
- Thoracic foam rolling: 2 minutes
- Cat-cow: 10 reps
- Wall angels: 2 sets of 10
Throughout day:
- Band pull-aparts: 2-3 sets of 20 (keep band at desk)
- Movement breaks every 45 minutes
Evening:
- Doorway pec stretch: All 3 positions, 30 sec each side
- Child's pose with lat stretch: 30 sec each side
3-4x Per Week (20-30 minutes)
Complete strengthening circuit:
- Prone Y-T-I raises: 3 sets of 10 each position
- Face pulls: 3 sets of 15
- Rows (any variation): 3 sets of 10-12
- Prone cobra: 3 reps, 15-second holds
- Superman holds: 3 reps, 15-second holds
Ongoing
- Maintain ergonomic workspace
- Practice good posture awareness
- Continue daily stretching and movement breaks
- Progress exercises as they become easier
Timeline: When Will You See Results?
Results vary based on severity, consistency, and individual factors, but typical timelines for postural kyphosis:
- Week 1-2: Increased awareness of posture, some reduction in muscle tension
- Week 3-4: Noticeable improvement in mobility, beginning to feel "taller"
- Week 6-8: Visible posture changes, significant strength gains, reduced discomfort
- Month 3-4: Substantial correction, new posture feels more natural
- Month 6+: Full correction for most postural kyphosis cases, maintaining becomes easier
Critical factors for success:
- Consistency beats intensity—daily practice outperforms occasional intense sessions
- Addressing ergonomics and habits is as important as the exercises
- Progress isn't always linear—some weeks you'll see more improvement than others
Common Mistakes to Avoid
-
Only stretching without strengthening - You need both. Stretching alone won't create lasting change without strengthening weak muscles.
-
Neglecting ergonomics - The best exercise program can't overcome 10 hours of poor posture daily.
-
Forcing thoracic extension - Don't arch aggressively. Gradual progression prevents injury.
-
Holding breath during exercises - Breathe continuously. Holding breath increases tension.
-
Expecting instant results - Postural changes took years to develop; correction takes months.
-
Overtraining chest/pushing muscles - Balance your training with a 2:1 or 1.5:1 ratio of pulling to pushing exercises.
-
Ignoring pain signals - Mild discomfort during stretching is normal; sharp pain is not. Stop and reassess.
-
Inconsistent practice - Sporadic effort produces sporadic results. Daily consistency is key.
-
Poor exercise form - Quality over quantity. Bad form reinforces bad patterns.
-
Neglecting the rest of the spine - Kyphosis often comes with forward head posture and lumbar issues. Address the whole chain.
Advanced Considerations
For Athletes and Advanced Trainees
Once you've mastered the basics, add these exercises:
- Dead hangs: Passive hang from a pull-up bar, letting spine decompress (30-60 seconds)
- Thoracic rotations with reach: From quadruped, deeper rotational mobility work
- Weighted prone Y-T-I raises: Add 2-5 lb weights for increased challenge
- Overhead carries: Walking while holding weight overhead forces thoracic extension
- Front squats: Requires upright torso, trains thoracic extension under load
- Pull-up variations: Build powerful upper back while promoting extension
When Kyphosis Persists
If you've been consistent for 12+ weeks without meaningful improvement:
- Seek professional assessment - A physical therapist can identify specific limitations
- Rule out structural causes - X-rays can reveal if vertebrae are wedged (Scheuermann's)
- Consider manual therapy - Hands-on treatment can address joint restrictions
- Evaluate other factors - Nutrition, sleep, stress all affect posture and recovery
- Check for underlying conditions - Osteoporosis, scoliosis, or other issues may be contributing
Kyphosis and Osteoporosis
If you're over 50 or have osteoporosis risk factors:
- Avoid aggressive spinal flexion - Forward bending under load increases fracture risk
- Focus on extension exercises - Prone work and wall exercises are safer
- Get a bone density scan - Know your status before intense exercise
- Work with a professional - A physical therapist can design a safe program
- Consider your calcium and vitamin D intake - Essential for bone health
Connection to Full-Body Posture
Kyphosis rarely exists in isolation. It's usually part of a postural pattern that includes:
- Forward head posture - Head positioned anterior to shoulders
- Rounded shoulders - Scapulae protracted, shoulders internally rotated
- Anterior pelvic tilt or posterior pelvic tilt - Compensatory changes in the lumbar spine
Addressing kyphosis often improves these related issues, but you may need to specifically address them as well. Check out our guide on how to fix rounded shoulders for complementary exercises.
Understanding the interconnected nature of posture is key to long-term correction. Our Anatomy Course covers how the spine, pelvis, and shoulder girdle work together to maintain (or lose) proper alignment.
Conclusion
Fixing kyphosis is achievable for most people with postural hyperkyphosis. The formula is straightforward:
- Release tight muscles (chest, lats, thoracic spine) through daily stretching and mobility work
- Strengthen weak muscles (upper back, posterior deltoids, lower traps) with targeted exercises
- Maintain improvements through ergonomic modifications and postural awareness
The challenge isn't complexity—it's consistency. Your body adapted to poor posture over months or years; reversing that adaptation requires sustained effort over months.
Start with the daily stretching routine and gradually add strengthening exercises. Focus on ergonomics at your desk. Set reminders to check your posture throughout the day. Within 6-8 weeks of consistent practice, you should notice significant improvements in both how you look and how you feel.
Remember: Your spine is designed to be upright. You're not fighting against your body—you're helping it return to its natural, healthy alignment.
Ready to deepen your understanding of posture and anatomy? Enroll in our free Anatomy Course and learn the science behind postural dysfunction and correction.
References
-
Katzman, W. B., et al. "Age-related hyperkyphosis: its causes, consequences, and management." Journal of Orthopaedic & Sports Physical Therapy 40.6 (2010): 352-360.
-
Bansal, S., et al. "Exercise for improving age-related hyperkyphosis: a systematic review and meta-analysis." Archives of Physical Medicine and Rehabilitation 95.1 (2014): 129-140.
-
Kendall, F. P., et al. Muscles: Testing and Function with Posture and Pain. 5th ed. Lippincott Williams & Wilkins, 2005.
-
Griegel-Morris, P., et al. "Incidence of common postural abnormalities in the cervical, shoulder, and thoracic regions and their association with pain in two age groups of healthy subjects." Physical Therapy 72.6 (1992): 425-431.
-
Quek, J., et al. "Effects of thoracic kyphosis and forward head posture on cervical range of motion in older adults." Manual Therapy 18.1 (2013): 65-71.
-
Hrysomallis, C., & Goodman, C. "A review of resistance exercise and posture realignment." Journal of Strength and Conditioning Research 15.3 (2001): 385-390.